 In the following post I am going to explain how to deploy an OVF Template from an URL.
The VMware vSphere Client allows you to deploy and export virtual machines, virtual appliances, and vApps stored in Open Virtual Machine Format (OVF).
An appliance is a pre-configured virtual machine that typically includes a preinstalled guest operating system and other software.
Methods to deploy an OVF Template
Using vSphere Client you have a couple of methods available to you :- Remote web server (URL)
- Local Disk, USB keychain drives or CD/DVD drives
- Shared network drives
- OVFTool (Command-line utility from VMware that allows you to import and export OVF packages to and from a wide variety of VMware platform products.)
In most cases, Administrators would probably browse their Local Disks or Network Shares.
However, In my case I want to deploy a template using the local datastore of my ESXi host, using an URL.
Using a Remote web server (URL) to deploy an OVF Template
Typically, in the following example I will use the built-in Web Server of my VMware ESXi host.
- Open vSphere Client and Click "File - Deploy OVF Template"

- Now we need to get the URL link to the OVF Template. Navigate to http://<Host IP> and select Browse datastores in the host's inventory

- Enter your credential (Example: root)

- Navigate into the datastore where your template is located. In my case, the template is on the local disk of my ESXi Host.

- Right click on this file and Copy the Shortcut (URL link)

- Go back to vSphere Client, Deploy OVF Template Wizard should be opened, Paste the URL in "Deploy from a file or URL" field, then click Next.

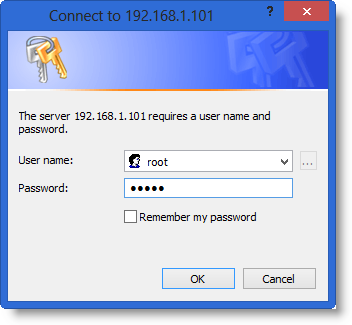 |
| You might have to enter your credential again to access the Host |
- And that's it, you are ready to continue the wizard. Verify the OVF template and click Next

- Enter a name for your new VM

- Choose the Datastore and Specify the Disk Format

- You are done, verify the information and click Finish! to launch the deployment.


You can find more information here : vSphere Virtual Machine Administrator Guide 5.1 [page 93]
No comments:
Post a Comment